How to Develop Robust and Maintainable JavaScript Code Within a Shiny Application

The ability to write JavaScript code is essential to creating fast, custom, highly interactive Shiny applications. Whenever you want near-instant user interaction, use browser features, or add custom server-client communication, you would reach out to JavaScript.
Despite all that, the majority of JS code in Shiny apps looks… sad. As if it’s a throw-away one-time copy-pasted code doing one little JS trick - nobody wants to go back to this code and seemingly no one wants to maintain and care about this code.
Make JavaScript your friend for building amazing Shiny apps! Read this guide to learn easy tips and tricks for writing clean, maintainable JavaScript code.
The situation gets out of hand when the number of lines of JavaScript code in the project grows. This is where Rhino helps: developers can easily split their code across multiple files, treat those files as modules (use import statements), and expose exported functions to the R code (via App.myFunction()). Rhino even gives you a pre-configured webpack that produces a minimized JS bundle.
But today we are going to go even further, and learn how to treat JS code with the same (if not greater!) care as we treat our R code. To keep up with this tutorial you will need to have VS Code, Node.js and Rhino (at the moment of writing versions are 1.86.0, 18.16.0 and 1.7.0 respectively).
Part 0. Setup and Introduction
Create a Rhino app and run one of its Node.js-dependant functions to initialize the .rhino folder. We also need to make .rhino indexable by git - the tweaks we are about to make should be available to CI/CD pipelines, as well as other developers on the team. In the R console, run these two commands:
After the installation is complete, replace .rhino/.gitignore file contents with just the following:
It ensures that we don’t track node_modules (JavaScript dependencies) in git, but other config files are available in version control.
Finally, to always have properly formatted JavaScript code, I like to enable the Prettier extension, enable formatOnSave setting in VS Code, and add .prettierrc file to the root directory with the following content:
Now we can start writing some code. Out of the box we have an app/js/index.js file available to us, where we can write some JavaScript. Let’s try this:
This function doesn’t look good, and if we run rhino::lint_js() we will get a few errors:
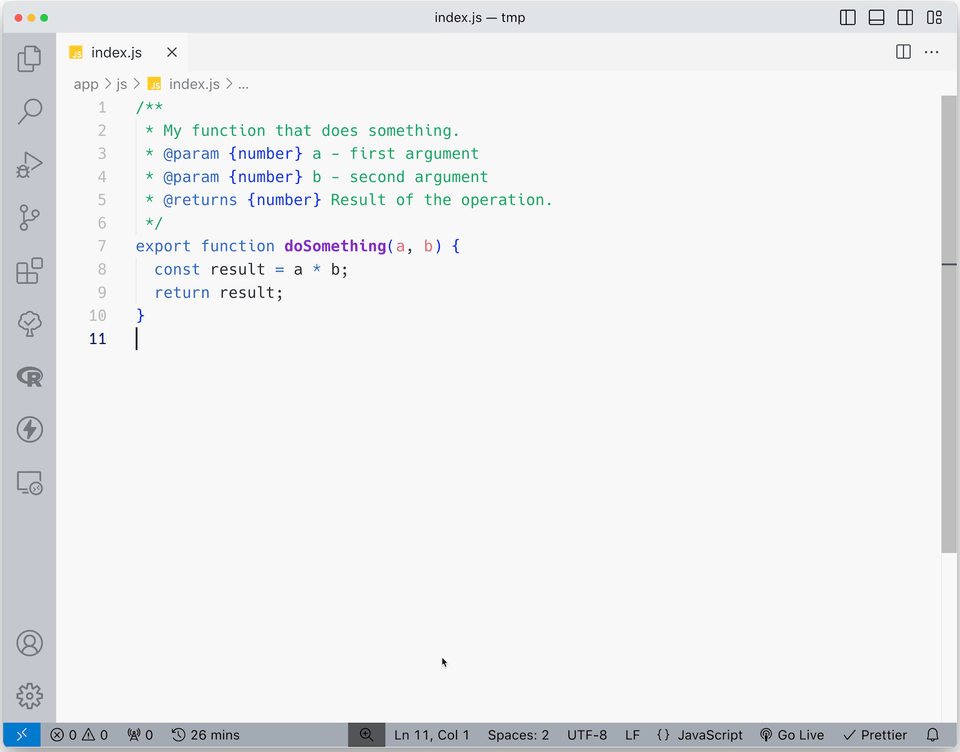
Okay, we can fix those by changing our function body and exporting the function itself (exported functions become available on App object that is created by Rhino):
Now, it would be great to document the parameters of this function as it will produce unexpected results if a and b are not numbers. This is the very first step to start caring about our code: similar to roxygen2 in R, we have JSDoc in JavaScript that enables us to write inline documentation:
Not only it looks better, the documentation is immediately available to us when we use this function in VS Code:
Part 1. Simple Typing
What we’ve seen so far was only the beginning and honestly, nothing fancy yet. Documenting the code is a common best practice, but even so it’s still worth mentioning, because we are going to write maintainable JavaScript.
Anyway, this is where things take off a little bit. While roxygen comments in R are mere suggestions, JSDoc comments are much more powerful. By leveraging the TypeScript compiler & server built into VS Code, we can get a TypeScript-like experience only with the comments.
To prove it, let’s first change our function signature:
Notice how, according to the documentation, it now expects string arguments and doesn’t return any value. But we don’t see any errors - we will only get them at runtime.
To fix it, let’s create a jsconfig.json file at the root of our project - this file will give some instructions to VS Code and we will update this file a few times in the future:
Now, we just need to reload VS Code by opening the command palette (Ctrl+Shift+P or Cmd+Shift+P for MacOS) and calling Developer: Reload Window.
Voila:
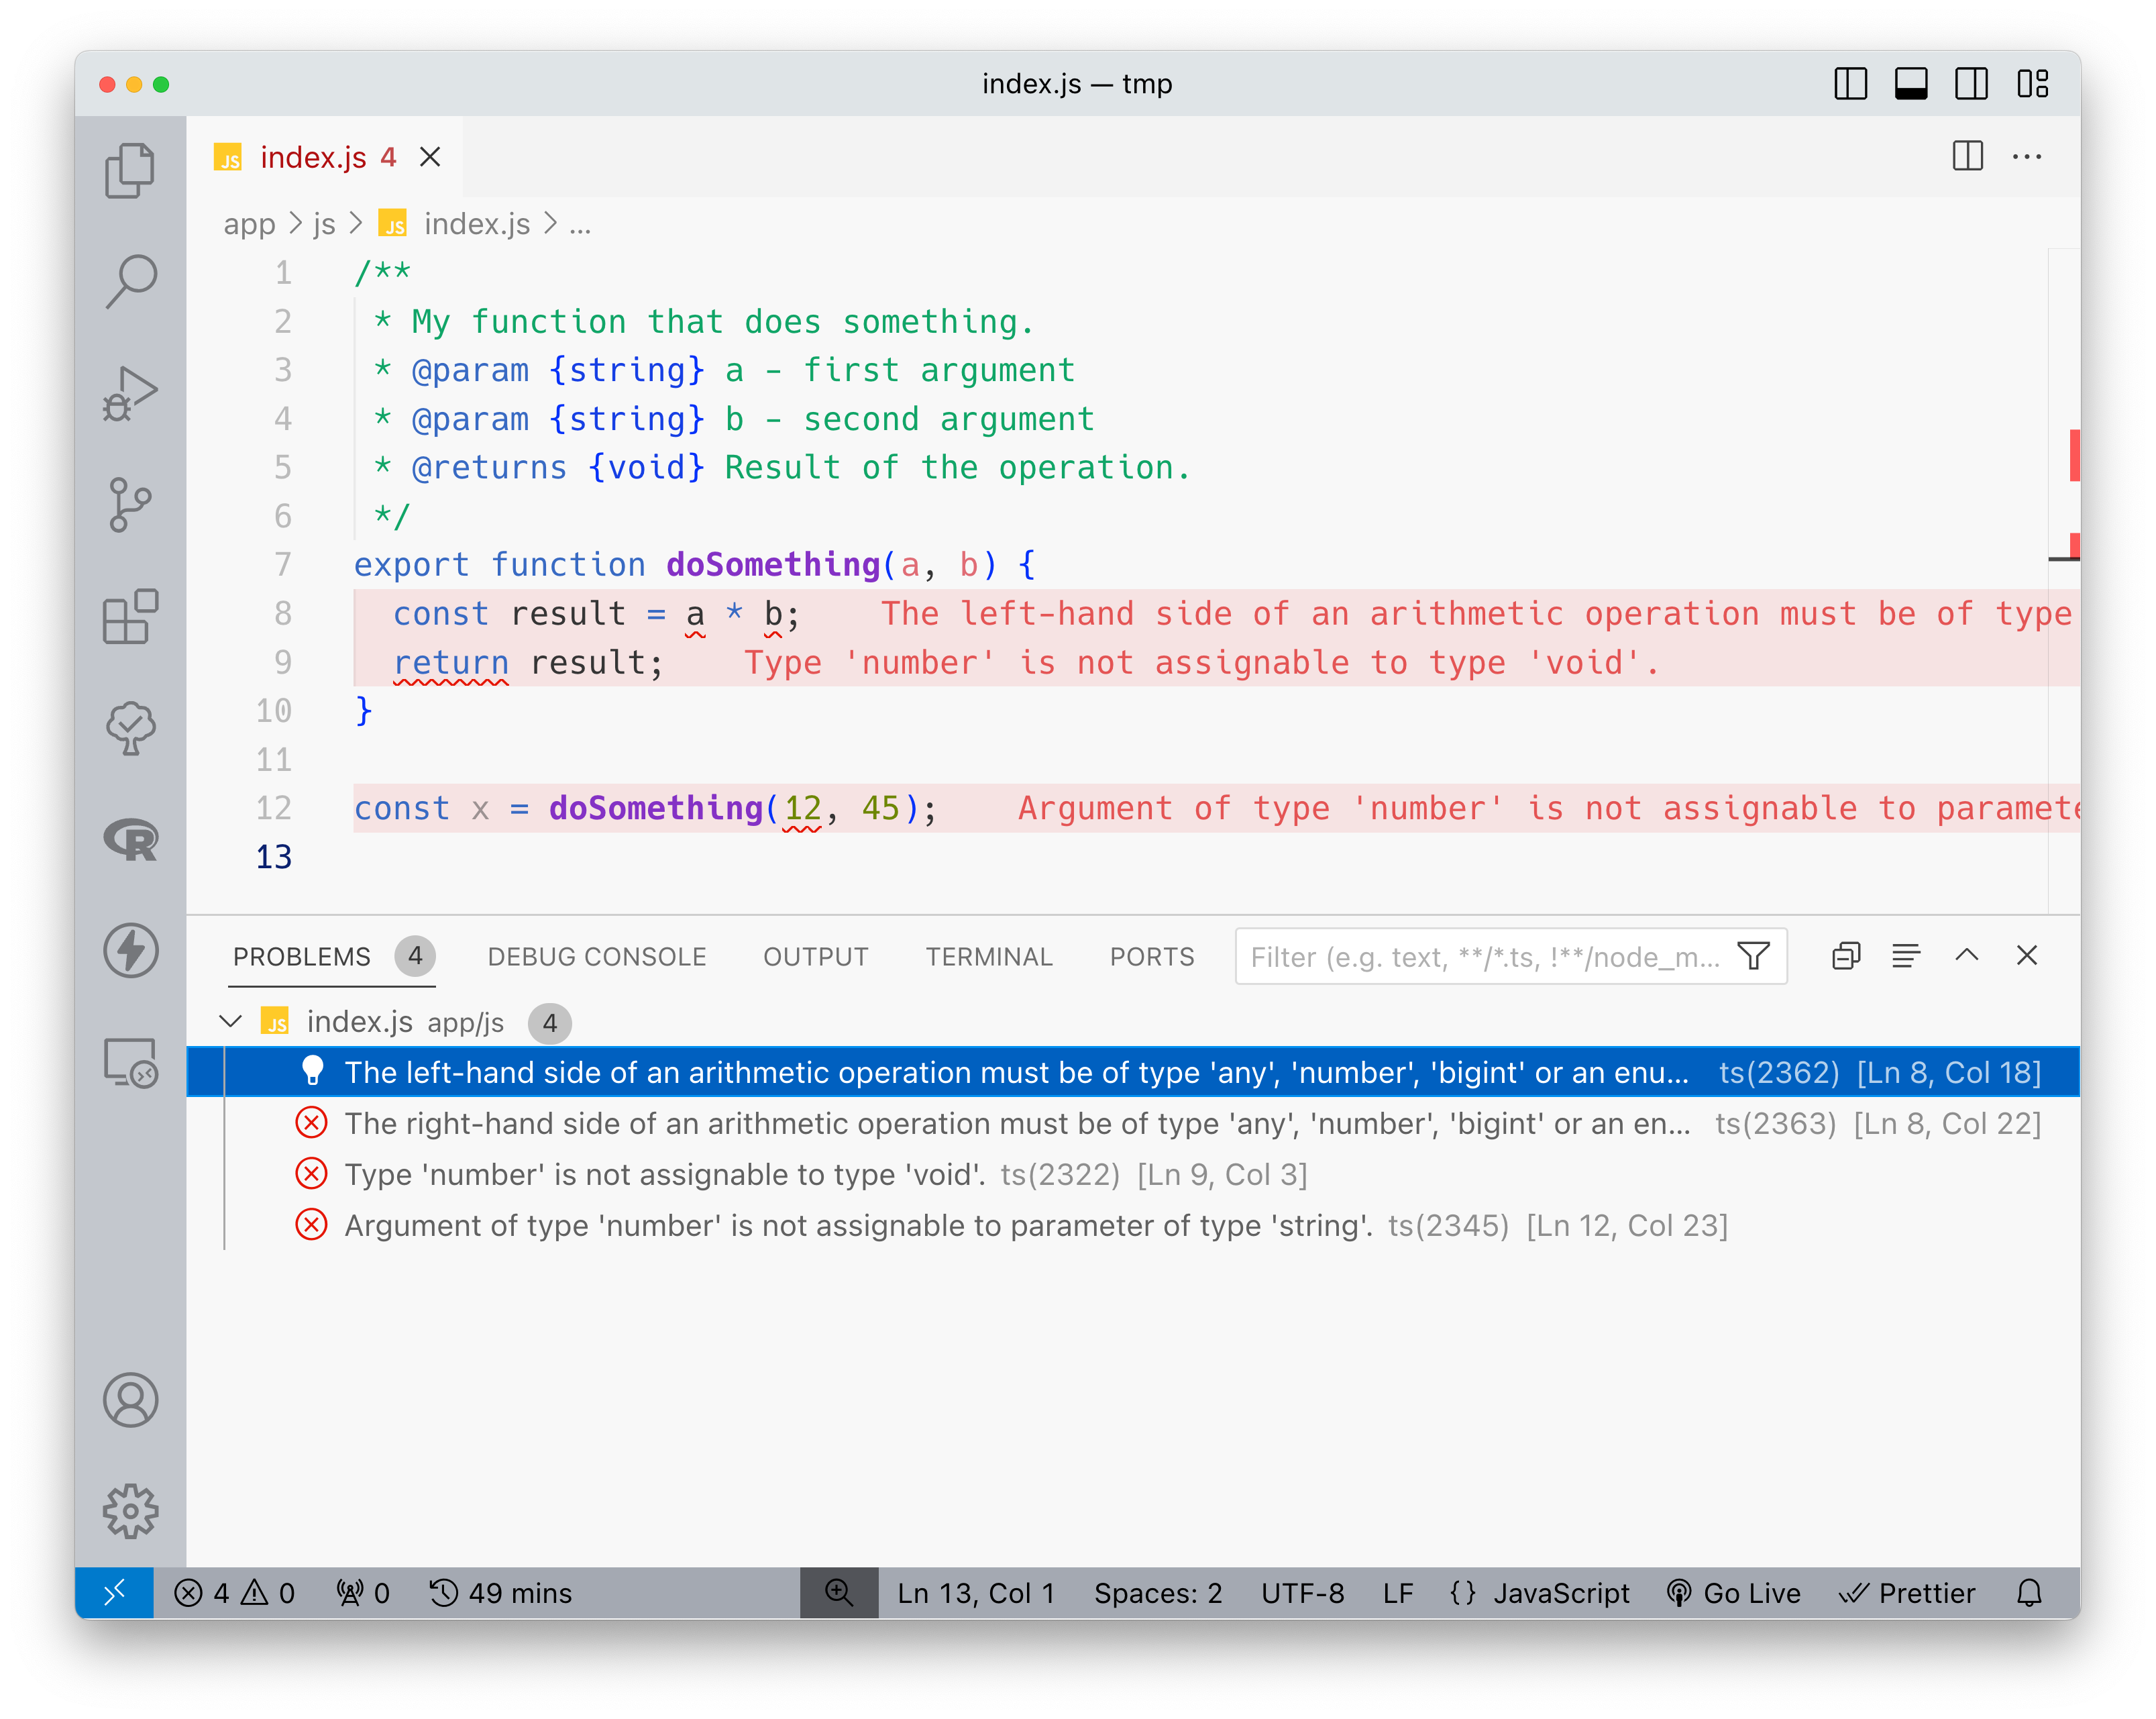
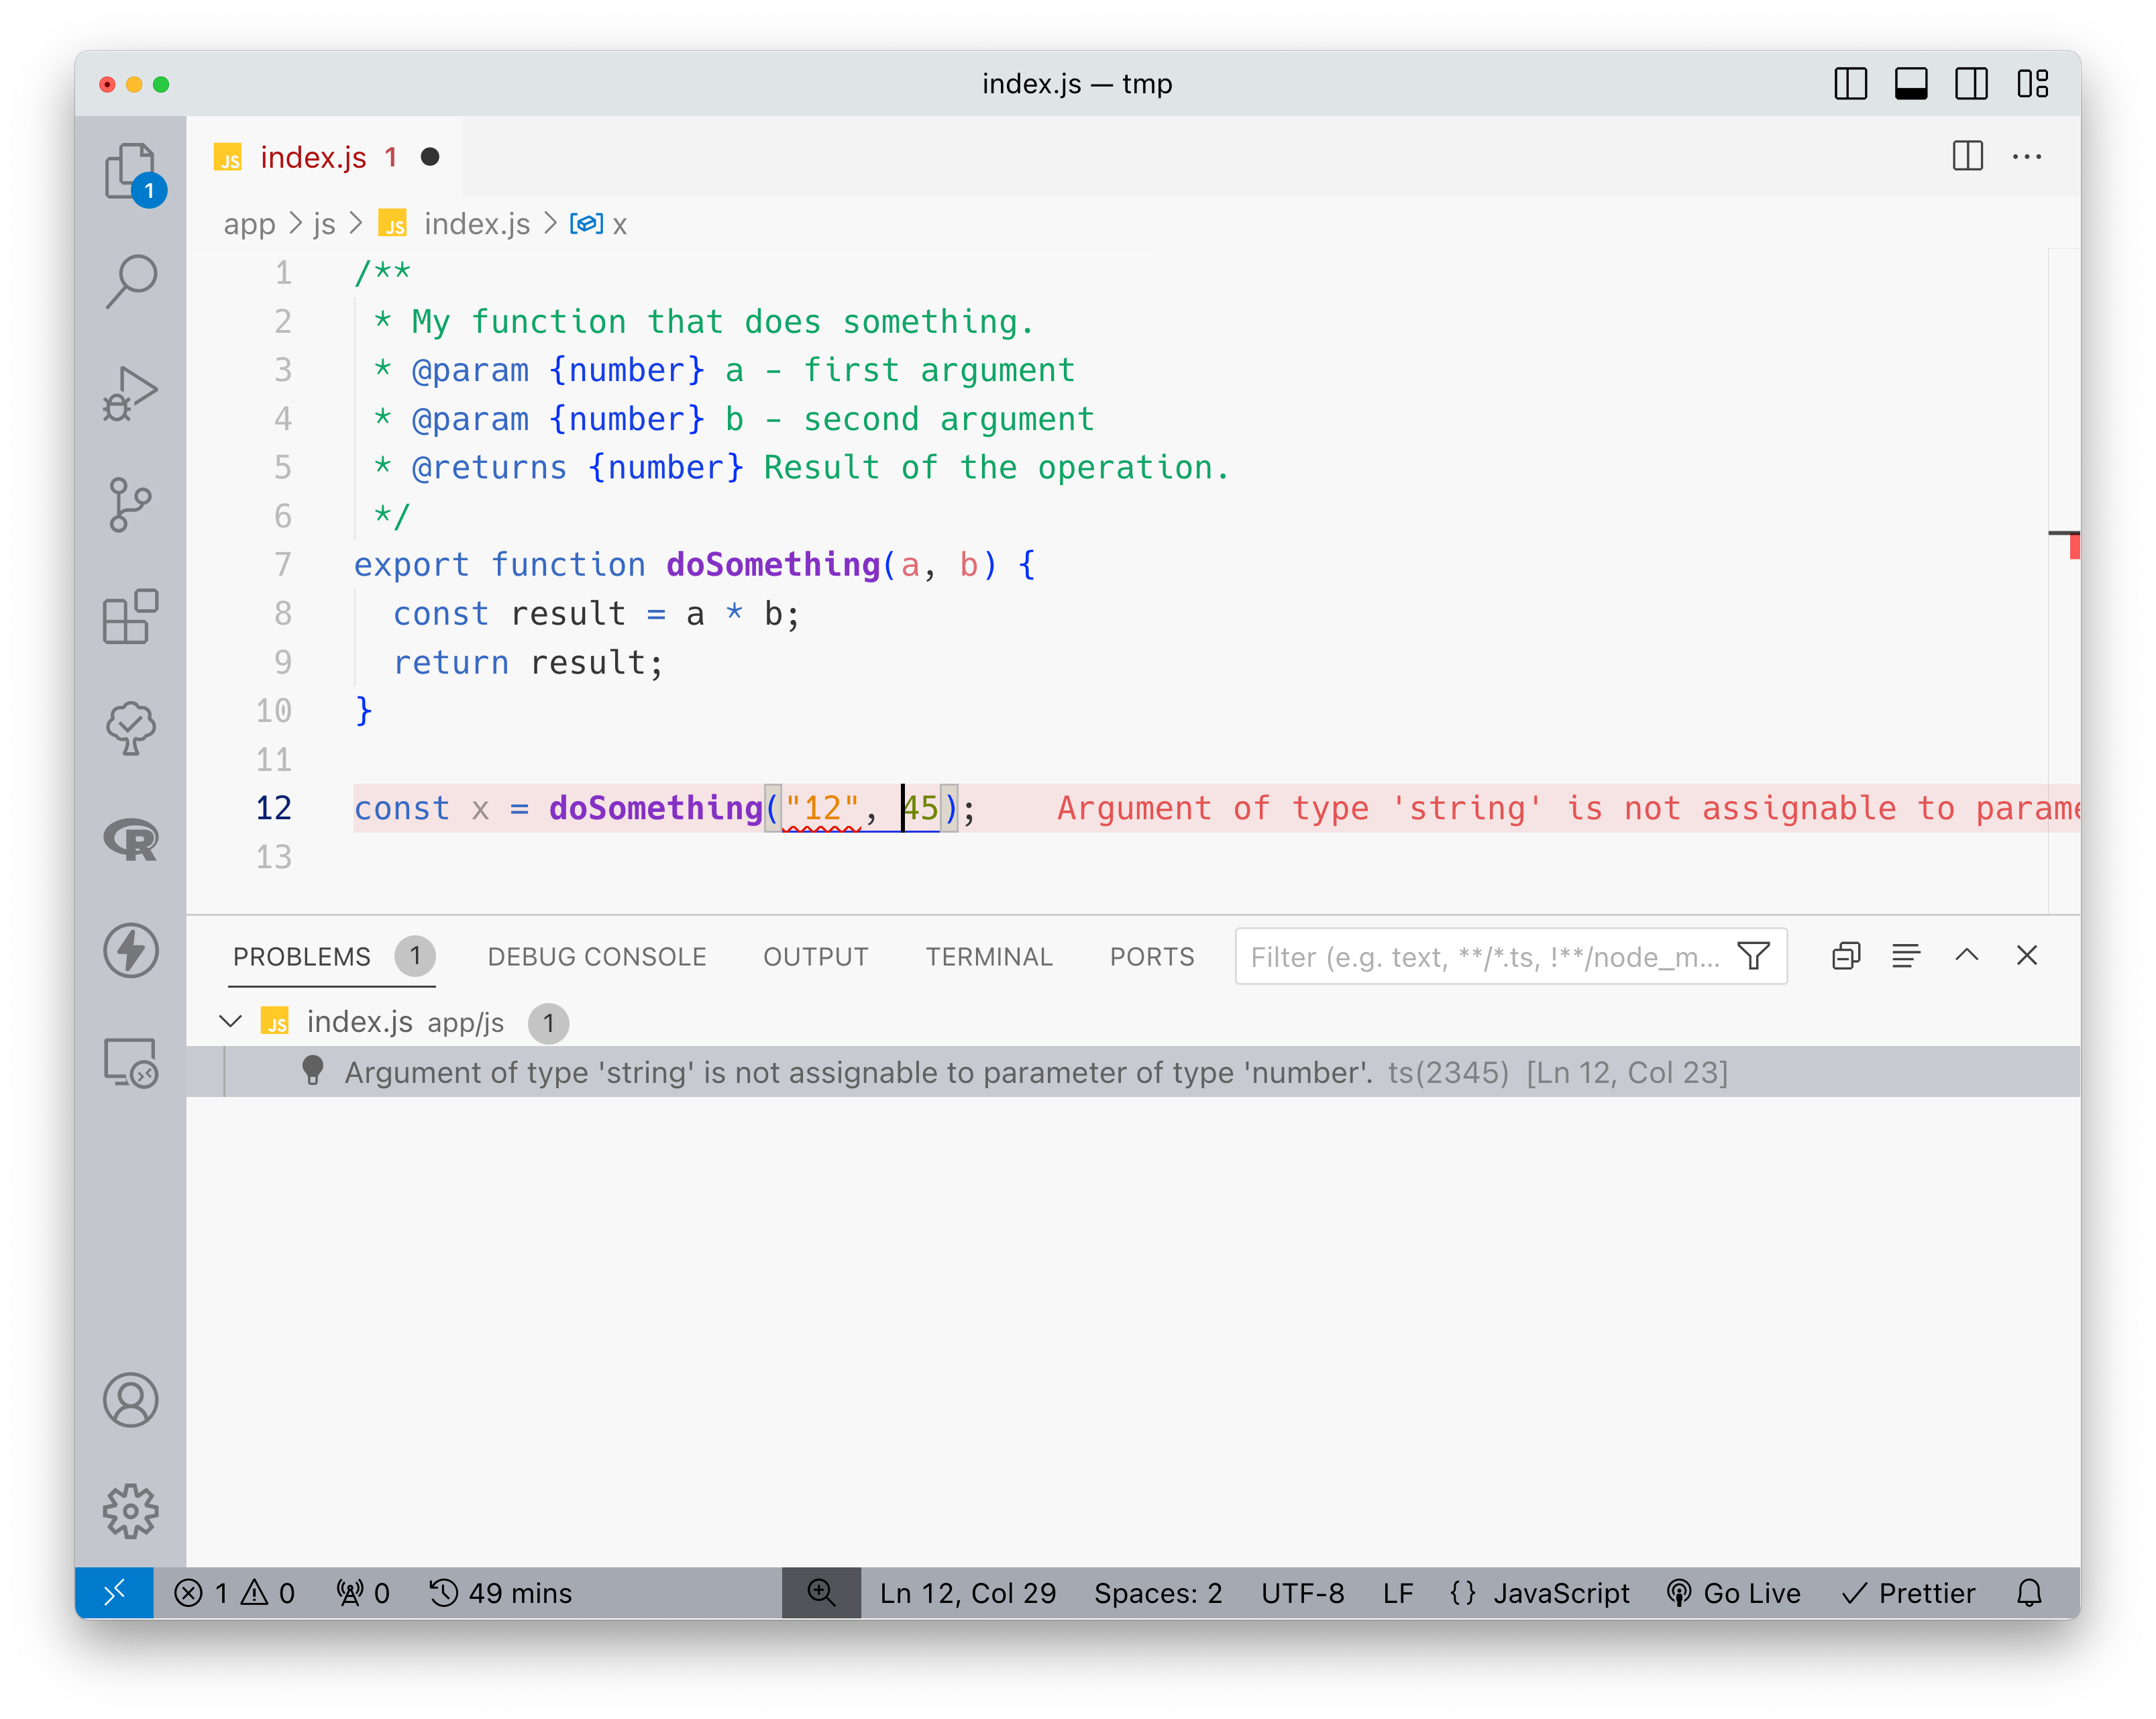
A more common scenario is depicted on the next screenshot: correct function signature, but incorrect argument types passed to the function:
You may think: this example is not very exciting, it’s clear what arguments should be passed to it. Well, let’s consider another function:
If you have ever worked with a UI framework in React, you might expect margin to be a number (because it will be processed and scaled based on other theme properties to make sure that the overall design system remains consistent).
But in vanilla JS it should be a string, e.g. “12px” or “1rem”, etc. And this is what we have defined in the JSDoc.
Moreover, thanks to the TypeScript server running, we have documentation and type checks not only for our code, but also for the built-in object - if we try to assign a number to element.style.margin we will immediately see a TypeScript error.
Part 2. Advanced Typing
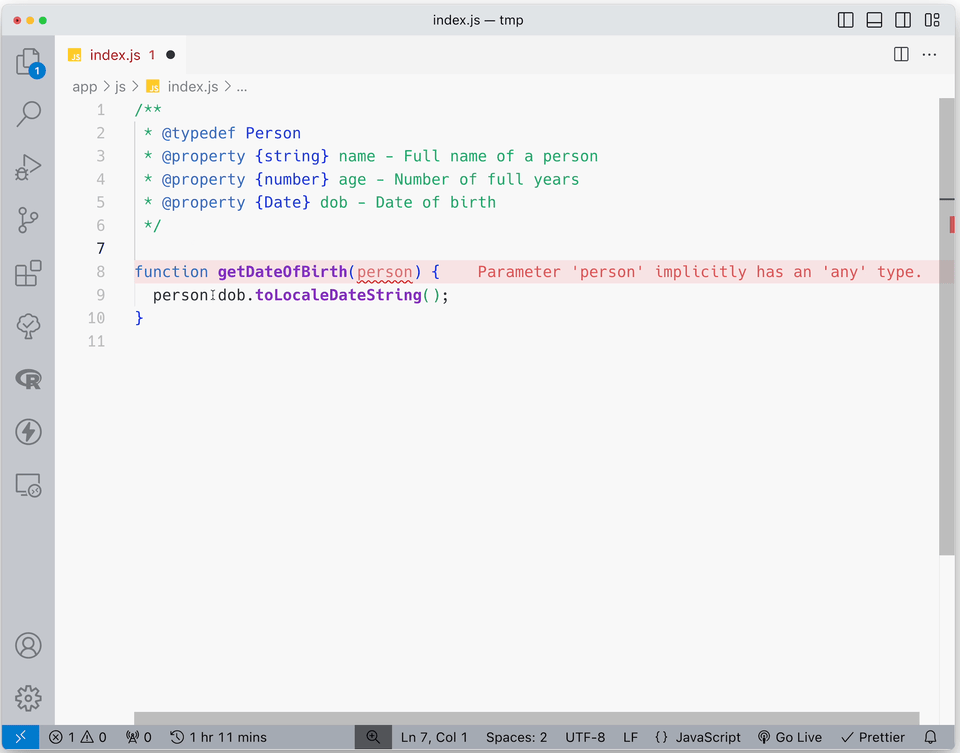
Aside from the primitive values, we often use Objects in JavaScript. Let’s consider a function that takes an Object representing a person, transforms one of its properties and returns the result:
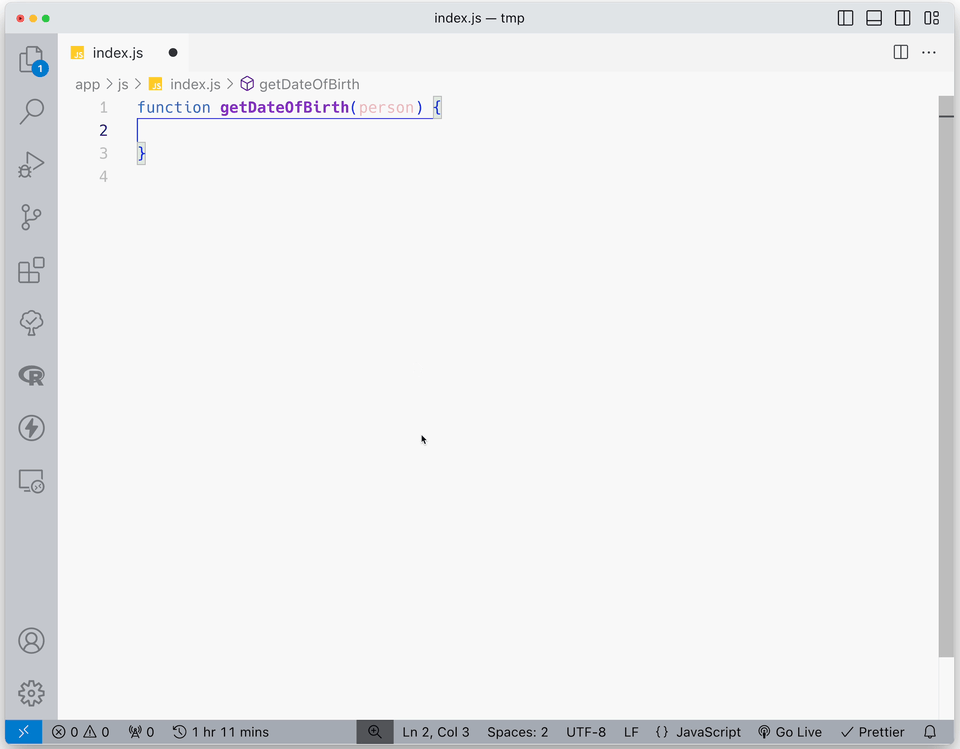
I get zero autocompletion on my person Object - but it’s fine (is it?), because I remember that it should have a dob property which is stored as Date.
So I will take this property, convert it to locale-aware date string and return it, right? Well, I wasn’t sure if I remember the method name correctly, so I had to create a new variable of type Date and check the available methods on it. Turns out I was wrong, and would get an error at runtime in my browser.
It would help to document the type of the person parameter, but this time it is an Object, not a primitive value. We can define complex object types with JSDoc the following way:
And now we can use Person as a custom type when defining parameters of our function, which will give us nice code completion.
Defining types in this way is OK, but there is a more convenient way. Remember that VS Code is running a TypeScript server in the background, which means that we can leverage not only JSDoc, but global type declarations as well using“d.ts” files.
Types from such files will not affect our code and they won’t be included in the final JS bundle - they will be used only by VS Code itself to run type checking and to give us code suggestions.
Let’s extract our type definition into a separate data.d.ts file in app/js/types folder and make it a little bit more complex:
Now we can use this interface in our JavaScript file:
.gif)
And just like that we wrote a little bit of TypeScript. We globally declared an interface Person that can be used throughout our codebase.
Combining R and Javascript for the first? Check out this blog post to learn wh it's a good idea and how you can get started.
Part 3. Type Definitions From 3rd Parties
Global type declarations are easier to read, easier to use and easier to maintain. But the best feature of d.ts files is that many 3rd party libraries written in JS ship these declaration files to provide developers with code completion and type safety.
I suggest that we try that out with our most beloved library: Shiny. This command will install Shiny type definitions, and the process might take a few minutes at first.
You can verify that the installation is successful by checking for the presence of .rhino/node_modules/@types/rstudio-shiny folder.
Usually when developing a JavaScript project one would have node_modules at the root of the project, so VS Code knows where to look for installed packages and types.
In the case of a Rhino app all JS-related stuff is hidden in the .rhino folder, so we need to explicitly “point” VS Code to the correct place. We can do it by updating the jsconfig.json and reloading the window as before.
Let’s go back to the index.js file and write some typical JS code that you can see in a Shiny app:
.gif)
I hope you enjoyed that sweet autocomplete just as I did! The only thing I had to remember is the shiny:connected event name.
This example was a little bit artificial, so let’s come up with something more useful. Along the way I will demonstrate another powerful feature of types - ability to catch potential errors when writing the code, not when running the app.
A fairly common situation in web development - and Shiny apps are no exception - is when developers know that a certain feature only works properly in certain browsers.
Let’s use an example from MDN to detect which web browser is used to access the app. In the scope of this article we only want to show the browser name on the screen, but in a real world scenario you may want to show a warning, or even disable some functionalities.
Here’s the JavaScript function to get the browser name:
And here’s a function that will set the corresponding input value in Shiny:
If you paste this code to your local VS Code, you will notice a TypeScript error: Cannot invoke an object which is possibly 'undefined'. What does it even mean and how is it possible? We will find out in a moment, but first let’s update our R code. Find output$message code block and replace it with the following:
Rebuild JS bundle and start the app (pro tip: you can open another terminal and run rhino::build_js(watch = TRUE) to keep it always up to date):
Open the app in the browser, and notice that… we don’t have anything on the screen 😕.
If you open developer tools in the browser, you’d see something like Uncaught TypeError: Shiny.setInputValue is not a function. We know that Shiny has the setInputValue method - the problem is that at the moment of invocation, setInputValue was undefined. The reason lies in the fact that Shiny initialization finishes with a small delay after the document is ready.
Anyway, guess what? This is exactly what our TypeScript error was trying to convey (maybe not in the best terms, but still) - there is a chance that when calling this function, it is not available yet. We can fix this issue by doing two things:
1. check that setInputValue is available,
2. invoke the whole thing only after Shiny has emitted “connected” event:
Build & run again and you will see the element. Try to open the app in Google Chrome and in another browser (e.g. Safari) to confirm that the text indeed changes.
Part 4. Rhino React Components
Rhino 1.4 introduced the ability to write React components and easily add them to the application. Let’s put together all the knowledge we’ve gathered so far and write a typed, documented React component. You can follow the OG Use React in Rhino tutorial to get familiar with the process.
Let’s make all necessary preparations: delete contents of index.js file, install shiny.react, install react types.
Notice that we need to install type definitions for the React version used by shiny.react:
Writing React components means that we are going to write some JSX, so we need to explicitly enable it in jsconfig.json:
Finally, let’s create a Reveal.jsx file in the app/js folder and copy-paste the component code from the Rhino tutorial:
We will be immediately greeted with a few type errors:
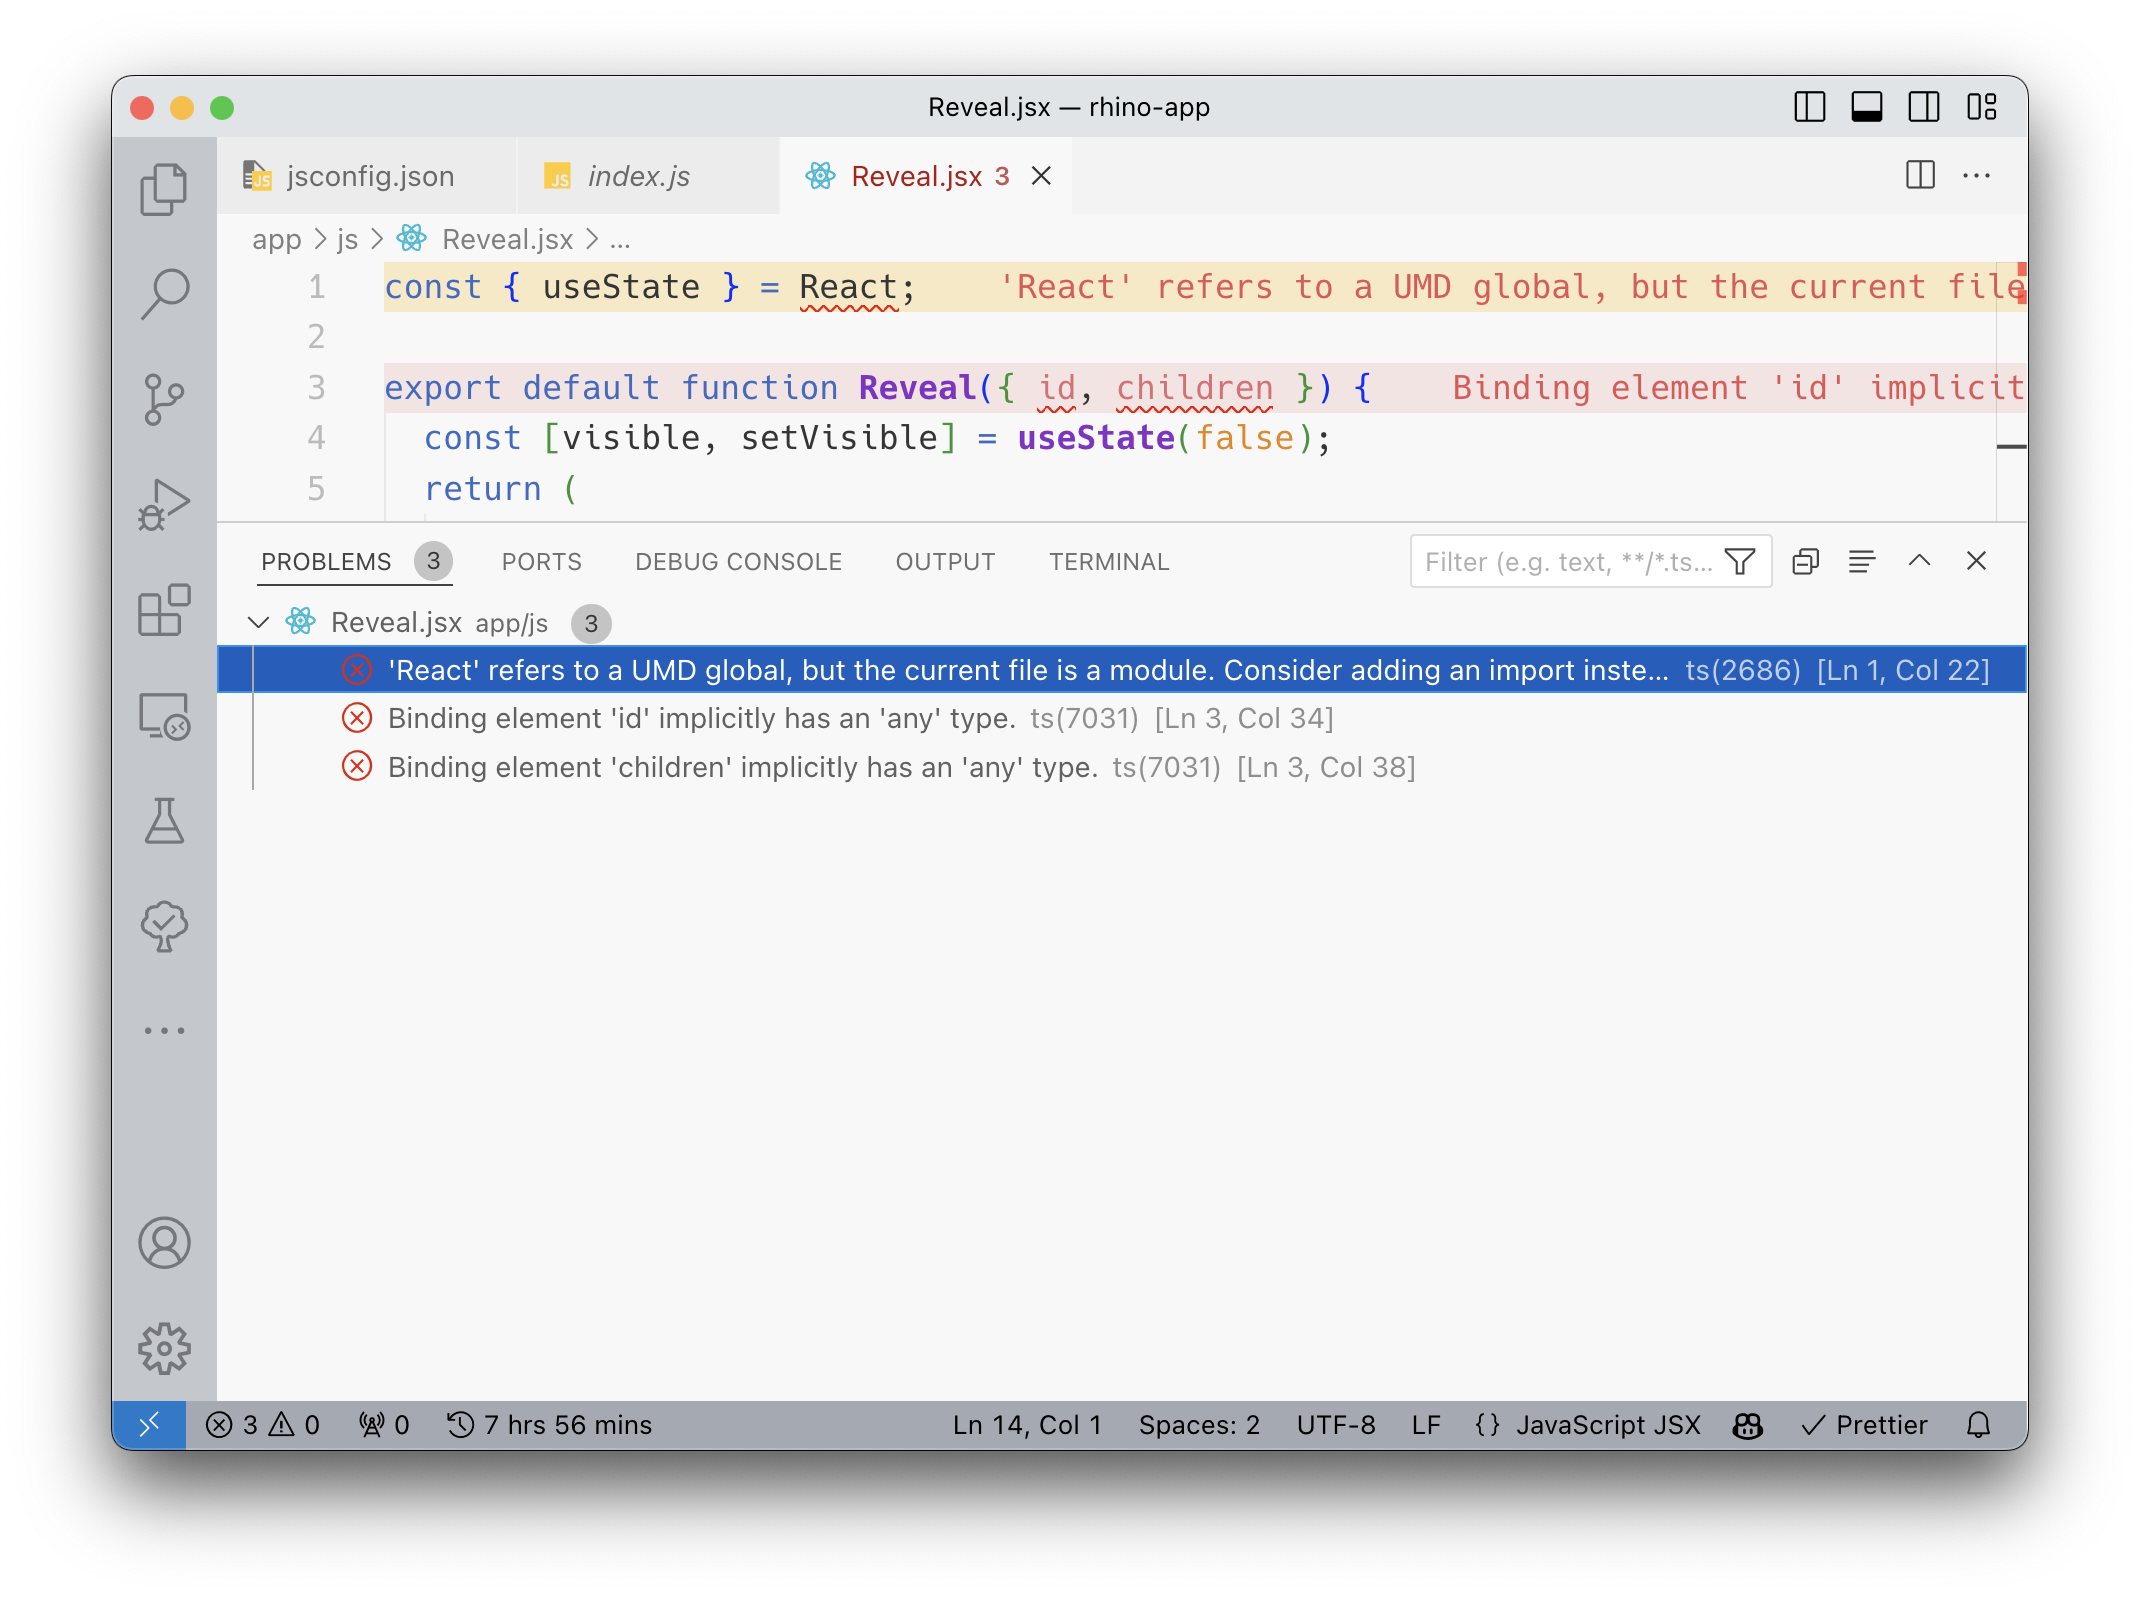
The first error suggests we should import React. However, in this case it is not necessary, as shiny.react ensures there is a global React object available. To silence the error we can simply replace React with window.React.
The next problem is implicit props type. A React component is just a function, so we can use JSDoc to specify the types of its arguments. But first, let’s create a react.d.ts declaration file in the app/js directory. Working with 3rd party types in JSDoc is a bit clunky: often times VS Code won’t recognize types from npm packages, so we can “re-export” them in a local declaration file like this:
And now we can prepend our component function with a JSDoc comment:
The component looks good, so now let’s register it with Rhino in the index.js file:
TypeScript will now complain that the window doesn't have a Rhino property. We can fix it by adding a local Window type declaration (why it works):
Now everything should look fine. You can follow the rest of the tutorial from Rhino documentation and make sure that everything works as expected.
Bonus: Cypress
Rhino comes with Cypress end-to-end testing framework which allows you to simulate user behavior by writing test cases in JavaScript. For those not familiar with Cypress it might be a little difficult to write those tests without code completion.
There is a way around this problem - a reference meta tag in the beginning of a JavaScript file:
Notice how we explicitly tell VS Code where to look for type definitions. With this single line, autocompletion is already there. Very nice indeed! However, this path looks somewhat cumbersome, and what’s more, it will be different in different scripts if you want to structure your test cases in folders.
There is another way: the JSConfig way. All we need to do is update the jsconfig.json file by adding .rhino/node_modules to the typeRoots property. However if you do it, VS Code will basically drown in type errors - because some node_modules don’t have type definitions and those that do might not work with this non-standard approach.
To avoid errors we need to explicitly define for which packages we require types in the types property. Notice that we now also need to include rstudio-shiny - previously it was implicitly imported from @types, but as soon as compilerOptions.types property is defined nothing is imported implicitly.
{
Now we should have code suggestions not only for functions and methods but also for values - which is extremely useful in methods like should.
Final Thoughts
I hope this material was helpful and more developers will treat JS in Shiny more seriously. Moreover, I find that adding “cool bits” of JavaScript functionality to a Shiny app is a nice way to start your web development journey and dive deeper into the technologies of the web. Next step - learn how to write code in TypeScript, transpile it into JavaScript and bundle it with a Shiny app.
On a final note, I would like to add a friendly reminder to use global declaration types with discretion. After all, these are only declarations - they may not necessarily coincide with what you get at runtime.
Did you find this blog post useful? Join our community and sign up for our weekly newsletter to get more content like this delivered to your inbox.
